Podman on BioHPC
Introduction
Docker revolutionized software development and deployment by popularizing container technology. However, Docker requires root privileges to build and run containers. This poses security risks and limits who can use Docker. Therefore, in most of the HPC environment Docker is not allowed.
Rootless Podman provides many benefits of Docker without requiring root:
-
Podman does not need a background daemon or root access. Containers run as non-root users. This improves security.
-
Podman uses user namespaces to provide an isolated container environment for non-root users. Processes inside containers cannot see or affect the host system.
-
Rootless Podman allows non-privileged users to build, run, and share containers easily, without involving IT/ops.
-
Podman has a compatible CLI with Docker. Most Docker knowledge transfers to Podman.
-
Podman can use Docker images and registries like Docker Hub. Image support is compatible.
In summary, Rootless Podman provides a user-friendly container platform for developers, analysts, and engineers. It improves security by eliminating the need for root privileges. Podman makes it easy for non-privileged users to benefit from container technology.
Basic Podman Commands
- If docker is preferred. an alias for the
podmancommand asdockercould be made.
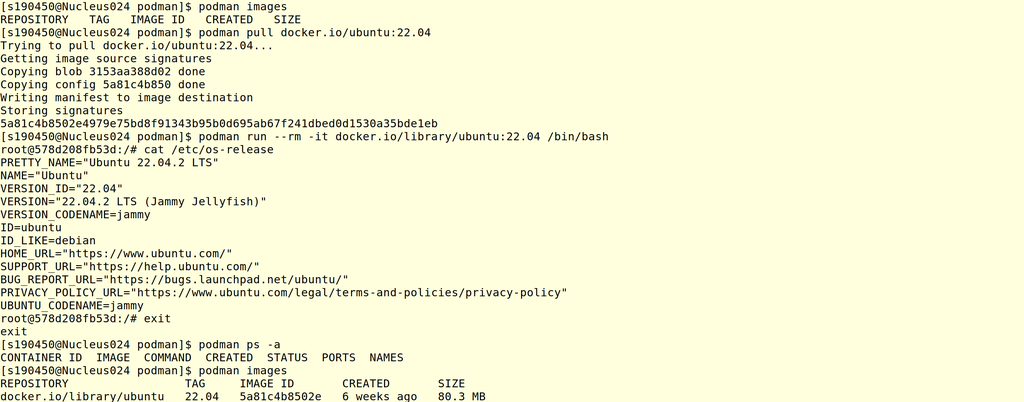
alias docker='podman'- To check the current images
podman images- To pull an image. By default, podman will try to pull images from
registry.redhat.io. Please adddocker.ioif you want to pull from Docker Hub.
# Pull from Docker Hub
podman pull docker.io/ubuntu:22.04

# Pull from your personal repo of BioHPC GitLab
podman pull git.biohpc.swmed.edu:5050/astrocyte/container/r:4.2.2- To run an image.
# Run the image directly (Better know the default command of the image before running it.)
podman run docker.io/library/ubuntu:22.04

# Run the image directly and remove the containers after finished.
podman run --rm  docker.io/library/ubuntu:22.04

# Run the image interactively (Go inside the image) and remove the containers after finished.
podman run --rm -it docker.io/library/ubuntu:22.04 /bin/bash- To check the existing containers
# Check running containers
podman ps

# Check all containers (including stopped ones)
podman ps -a- To remove containers/images
# Remove the container with an ID as b61f5b266e6f
podman rm b61f5b266e6f

# Force to remove the container with an ID as b61f5b266e6f
podman rm -f b61f5b266e6f

# Remove a image
podman rmi docker.io/library/ubuntu:22.04

# Force to remove a image
podman rmi -f docker.io/library/ubuntu:22.04- To save/load an image
# Save an image to tar
podman save docker.io/library/ubuntu:latest > ubuntu_latest.tar

# Remove the image for testing
podman rmi docker.io/library/ubuntu:latest

# Load the archived image
podman load < ubuntu_latest.tar

# Check the images again
podman images- To convert an image to Singularity image
module load singularity/3.9.9

# Convert docker archive to Singularity image
singularity build ubuntu_latest.sif docker-archive://ubuntu_latest.tar

# Run with Singularity
singularity exec ubuntu_latest.sif /bin/bash- To push an image to BioHPC GitLab container registry.
In order to do this, you need to create an Access Tokens from your BioHPC GitLab settings and log in with podman first. Here are the steps:
- To create a Personal Access Token for your BioHPC GitLab account. (This kind of token could be used to access all your repos on BioHPC GitLab).
- Log in to your BioHPC GitLab
- Select
Preferencesfrom the dropdown of your personal icon at the top right corner - From the left menu select
Access Tokens - Fill out the form by adding
Token name,Expiration date,Select a role, andSelect scopes. To be able to push images, you need at least have thewrite_registrypermission selected. - Click the
Create personal access tokenbutton. - Write down the token string. (This will be your password and it will only show once!).
- To create a Project Access Token for your repo. (This kind of token only controls the access of the repo).
- Go to your project on BioHPC GitLab.
- Got to
Settings–>Access Tokens(in the left-hand menu). - Fill out the form by adding
Token name,Expiration date,Select a role, andSelect scopes. To be able to push images, you need at least have thewrite_registrypermission selected. - Click the
Create project access tokenbutton. - Write down the token string. (This will be your password and it will only show once!).
- To log in to BioHPC GitLab container registry
podman login git.biohpc.swmed.edu:5050
# Provide the "Token name" as your username
# Provide the "Token" as your password- To tag an image. (Need to tag an image before pushing to a private registry)
# Tag the image with private BioHPC GitLab repo
podman tag docker.io/library/ubuntu:22.04 git.biohpc.swmed.edu:5050/astrocyte/container/ubuntu:22.04- To push the image to BioHPC GitLab container registry
podman push git.biohpc.swmed.edu:5050/astrocyte/container/ubuntu:22.04- To pull the image from BioHPC GitLab container registry with Podman
podman pull git.biohpc.swmed.edu:5050/astrocyte/container/ubuntu:22.04- To pull the image from BioHPC GitLab container registry with Singularity
module load singularity/3.9.9

singularity pull docker://git.biohpc.swmed.edu:5050/astrocyte/container/ubuntu:22.04
Use Podman on BioHPC
Podman is now available on the BioHPC cluster after the latest update to RHEL 7.9. This guide will demonstrate how to use rootless Podman under your user account. An important thing to note is that because it is rootless, everything Podman creates - including images and containers - is stored in a temporary directory and removed when you log out. So remember to push your images to a container registry like the BioHPC GitLab ((git.biohpc.swmed.edu:5050)) or Docker Hub after building to avoid losing them.
Option 1. Use Podman through BioHPC WebGUI
- Go to
BioHPC Portal–>Cloud Services–>Web Visualizationat here (https://portal.biohpc.swmed.edu/intranet/terminal/webgui/)
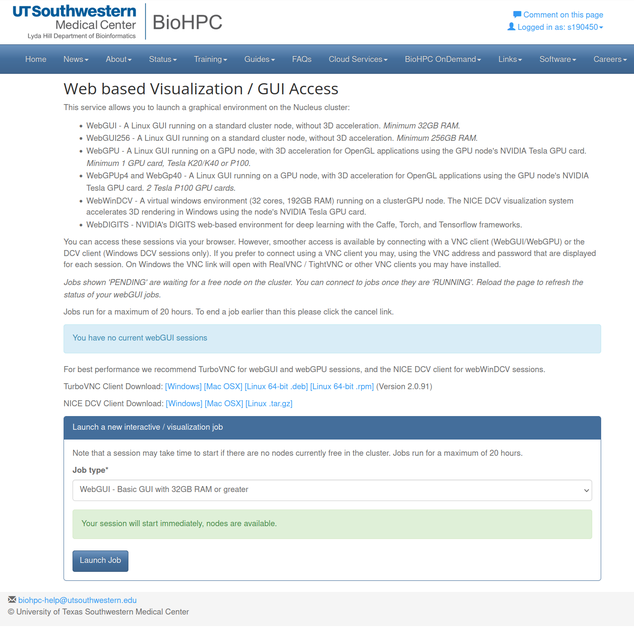
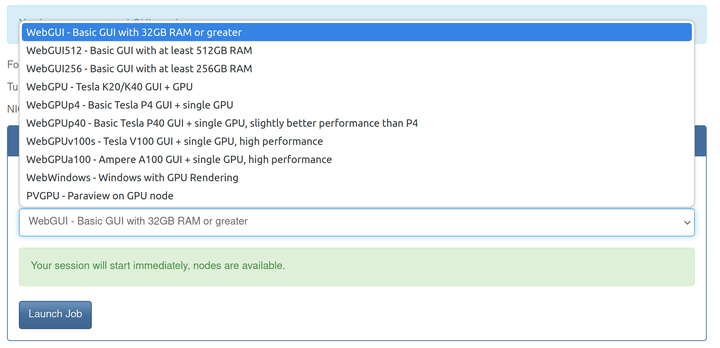
- Select the Job Type from the dropdown list and launch the job.
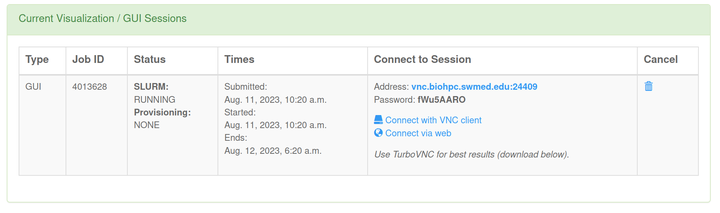
- Once the resource is ready, connect to the session with web or VNC Client.
- Open Terminal and start to use the Podman
Option 2. Use Podman via SLURM interactive job
- Log in to Nucleus with any SSH software you prefer
# E.g. run the ssh command from Linux to log in Nucleus
ssh YOUR_USER_NAME@nucleus.biohpc.swmed.edu- Start an interactive SLURM job on
superpartition. You can replacesuperwith any partition you’d like to use, butsuperis quick.
srun -p super -N 1 --pty bash- Once the resource is ready for you, then you can start to run the
podmancommands.
Option 3. Use Podman via SLURM sbatch job
Similar to Option 2, the user could create a sbatch script and submit the job to SLURM.
- Log in to Nucleus with any SSH software you prefer
# E.g. run the ssh command from Linux to log in Nucleus
ssh YOUR_USER_NAME@nucleus.biohpc.swmed.edu- Create a sbatch script like the example below
#!/bin/bash
#
#SBATCH --job-name Podman
#SBATCH -p super
#SBATCH -N 1
#SBATCH -t 0-2:0:0
#SBATCH -o job_%j.out
#SBATCH -e job_%j.err

podman images

podman pull ubuntu

podman run --rm -it docker.io/library/ubuntu:latest cat /etc/os-release- Submit the script to SLURM
sbatch YOUR_SBATCH_SCRIPT