Introduction to BioHPC
This guide is a companion to the BioHPC introductory training session, which is required for all new users. Essential information about BioHPC and how to use our services can be found here. Use it as a quick reference, and in conjunction with the other detailed guides to find your way around our systems. Click the links below to quickly jump to the information you need. Any questions or suggestions can be emailed to biohpc-help@utsouthwestern.edu or submitted using the 'Comment on this page' link in the top right of this site.
About BioHPC
Who and what is BioHPC?
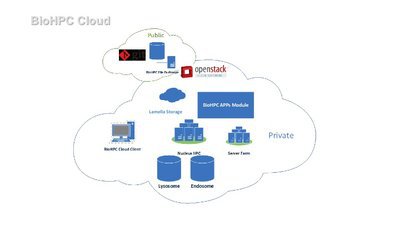
BioHPC is the high-performance computing resource at UT Southwestern. We provide the hardware, services and assistance necessary for UT Southwestern researchers to tackle large computational problems within their research work. BioHPC is different from many HPC centers due to the diverse range of users we have. We aim to offer convenient access to our systems using a wide range of cloud services easily used via the web. Users can benefit from our large storage systems and powerful compute cluster without needing expertise in Linux and HPC.
BioHPC’s core hardware currently consists of a 574-node compute cluster, and over 20 PB of high-performance storage. Follow the links to our to find out more about our systems on this site. Most users will become familiar with the Lamella cloud storage gateway and our compute cluster called Nucleus.
A team of 12 staff from a diversity of backgrounds manages BioHPC systems, collaborates on research projects, and provides general support to users. Led by BioHPC director Liqiang Wang, the team has a range of expertise covering bioinformatics work, mathematical simulation, image analysis, software development, and hardware support. The best means of contact is by emailing biohpc-help@utsouthwestern.edu.
What services does BioHPC provide?
- Storage – Our high performance storage systems provide user, laboratory, department, and collaboration allocations with fast access from the campus 10Gbps or 1Gbps networks, via web interfaces, drive mounts directly to your workstation, or through FTP transfers.
- Computing – Jobs and interactive GUI sessions can be scheduled on Nucleus, our 574 node cluster. Nucleus features nodes with 32GB, 128GB, 256GB and 384GB of RAM. Additional nodes contain powerful GPUs, including the NVIDIA P4, P40, P100, and V100 cards.
- Visualization – Complex 3D visualization tasks can easily be performed on Nucleus' GPU nodes, with smooth and responsive access from your BioHPC workstation, Windows PC, Linux system, or Mac. Sessions can be accessed by VNC connections or within your web browser.
- Cloud services – Most of our systems can be accessed via your web browser. Through our portal page, you can submit a job to our SLURM scheduler, access the Nucleus cluster directly, start up and interact with a GUI visualization session, access a powerful web desktop which can share the same workspace across all members of your research group, use our in-house NGS or Galaxy pipelines, store images in our OMERO imagebank, collaborate on and share code with our GitLab repository service, along with many other services.
- Training – We offer introductory training sessions every 1st Wednesday of each month, a coffee session with BioHPC every 4th Wednesday, and a 2-day workshop every quarter. To view the current training calendar, click here. Previous training topics and slides can be found here.
- Support & Help – Staff are available to advise and assist you in the effective use of our systems for your research, as well as to help you troubleshoot technical or computational problems.
How do I register for an account?
Our initial account registration process is automated. Fill out the online registration form and watch for an email to confirm your registration details. Once your account is registered, you will need to attend a mandatory new user introduction session. These take place on the first Wednesday of each month at 10:30AM and are conducted via Microsoft Teams (Copy the meeting link). You will receive training notification emails every Monday once you complete the registration.
When will my account be activated?
Your account will be fully activated for access to our systems after you have attended the introductory training session. Accounts are generally activated in the following 3-4 days. In very busy times when there are a large number of user registrations, you may need to wait a few more days before receiving your activation email.
How do I contact BioHPC?
You can contact BioHPC staff:
By email to biohpc-help@utsouthwestern.edu
In person at our office in the J building, 9th floor
In any case, we strongly prefer that you initially send an email to biohpc-help@utsouthwestern.edu, as this is tracked using a ticket system that allows us to provide a prompt response from the member of staff best equipped to answer your question. Tickets may also be submitted through the BioHPC Portal, but this does not allow you to provide attachments.
The BioHPC Portal
Introduction to the BioHPC portal
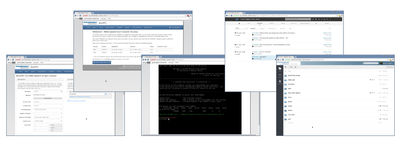
The BioHPC user portal at https://portal.biohpc.swmed.edu is the central location to find information about, and gain access to, nearly all of our services. If you use BioHPC heavily or visit regularly, you might want to set the portal as your home page or bookmark it.
The home page of the Portal highlight news and upcoming training sessions. You can directly view any open support tickets you have and access our cloud services. The status of the cluster and current job queue are shown for quick reference. The content of the portal is broken into various sections in the top menu bar:
- News – Updates and timely information from BioHPC, usually posted when we make important upgrades, introduce new services, or have important announcements for users concerning downtime or service disruptions.
- About – Detailed information about BioHPC, our systems, and our staff. Here you can learn more technical information about our hardware, and read the backgrounds of our staff.
- System Status – Access to an overview of our cluster status, the job queue where you can monitor the status of your jobs, and cluster usage (restricted).
- Training – Our internal training calendar of upcoming training sessions, usually related to specific software or packages. This is where you can download slides and materials from past sessions, and find links to other recommended training resources on the web.
- Guides / FAQs – In depth guides (like this one!) that complement our training sessions, and provide a reference for users to use our systems. These guides are usually more comprehensive than the corresponding training slides.
- Cloud Services – Links to all of our services that you can access and manage via your web browser.
- Software – Downloads for software that is recommended or required to access our systems. We provide links to the most common programs that are useful on Windows PCs, Mac, and Linux systems. This is also where you can find the list of modules installed on the system.
Training Calendar and Materials
BioHPC holds 4 training sessions each month on Wednesday at 10:30 am via Microsoft Teams. The first Wednesday is always reserved for New User Training. The calendar lists upcoming training topics - if there is a topic that you believe should be covered, please feel free to let us know so that we can continue to make sure our training is relevant and useful to the campus community.
Please browse our training calendar to find sessions interesting to you. If you miss a session, the training content can be found on the portal within a day or two. If you need immediate help, please send us an email and we can discuss an impromptu training session if necessary.
Portal Guides and FAQs
We’re working hard to improve the tutorial and reference material available on our website. Guides (like this one) will be added to the Guides / FAQs section of the portal as quickly as possible. When a new service is available, we’ll try to offer a guide as a companion and reference for the training session.
Using BioHPC Storage
What storage is allocated for my account?
Every BioHPC user received multiple allocations of storage, with different amounts at different locations. The major storage locations on our cluster are known by their path names: home2, project, and work. Standard allocations for each user are:
home2 ( 50 GB/user ) - A quota for a personal home directory at /home2/<username>. This is appropriate for storing private configuration files, scripts, and small programs that you have installed yourself. It should not be used for storing and analyzing large datasets. Exceeding your home2 quota can lead to you being unable to use many BioHPC services.
work ( 5 TB/user )– The /work directory is an additional per-user storage area with different hardware than the project space, and is appropriate for 'hot' data which is actively being analyzed, or which is frequently accessed. It should not be used for long-term storage and inactive data should be moved to project space. Each user has a work directory at /work/<department>/<username>. A department shared directory can be found at /work/<department>/shared.
project ( 6 TB/group ) - The /project directory is the main storage area on BioHPC, and is appropriate for raw data or data which is not being accessed multiple times a day. Additional space is available at the request of a lab PI, depending on arrangements with your department. Your lab’s project space can be found at the path /project/<department>/<lab> . Within this space, you are free to organize your data as you would like. Some labs choose to have a folder for each lab member - other labs choose to have folders for each project. All labs have a ‘shared’ folder inside their project space at /project/<department>/<lab>/shared that can be accessed by anyone in the lab group. Another ‘shared’ folder at /project/<department>/shared is accessible by all members of a department.
archive ( 5 TB/group ) - The /archive directory is appropriate for 'cold' or infrequently used data, and is not optimized for efficient access. Files stored on /archive consume 2/3 the storage allotment they would in other storage spaces, i.e. a 3GB file will only consume 2GB of your storage allotment. As a result, the 'effective size' of /archive is 7.5 TB. Additional space can be allocated if the request is approved by your department chair.
lamella.biohpc.swmed.edu - 100GB storage on the BioHPC private cloud. Accessible only on campus or while connected to VPN.
cloud.biohpc.swmed.edu - 50GB storage web-interface on our external cloud, can share with researchers outside of our UT Southwestern campus. Please note that this space is not within the main UTSW network, and does not enjoy the same level of security that the other storage spaces do. Under no circumstances is protected data allowed to be placed on the cloud.
Is my data backed up?
It is important that your data be kept safe against accidents and catastrophes. To help ensure your data is kept safe, BioHPC performs backups on a regular basis.
Backups come in two basic forms:
- Mirror backups are a bit-for-bit copy of your data, taken as a single snapshot in time, and are intended to protect against catastrophic loss of data. Mirror backups are overwritten during each backup event, so you will only be able to revert to the point in time that the snapshot was taken
- Incremental backups take an initial single snapshot of your data. After this, each backup event will examine the differences between the old data and the new data and record only the changes. This allows for a more fine-grained rollback, but can consume a large amount of storage if the data has frequent, large changes. This does not protect against catastrophic data loss.
We currently backup data on BioHPC as follows:
- Data stored directly in the
lamella.biohpc.swmed.edusystem is backed up weekly, creating one mirror copy. This copy does not affect your storage allocation. - Backup of
/home2is performed twice per week (Mon and Wed), creating two mirror copies representing two points in time. These copies do not affect your storage allocation. - The files under
/workare backed up weekly, creating one mirror copy. This copy does not affect your storage allocation. - Files under
/projectare backed up by PI request. Email BioHPC and let us know which directories or files you want to backup, how often the backup should be run, and any other details you feel are relevant. Please note that this backup does consume your /project storage allocation. You may choose to have a full mirror backup of the files, in which case each backed-up file or folder will consume 2x /project allocation (e.g. a 5GB file, mirrored, will consume 10GB of your /project allocation). You may also choose an incremental backup, in which case each backed-up file or folder will consume as much storage as necessary to store the incremental history (e.g. a 5GB file which is never changed will consume 5GB, while one which is entirely overwritten in between every weekly backup for a month will consume ~25GB) - Files under /archive are backed up by PI request, similarly to /project. Please note that the 2/3 storage cost does not apply to mirror backups. A 2GB file backed up via mirroring on /archive will cost 2GB for the original, plus 3GB for the backup. A 2GB file backed up via incremental changes will cost the base 2GB plus the cost of storing the incremental history.
- See the BioHPC Cloud Storage Guide for more information.
- Email biohpc-help@utsouthwester.edu to request recovering files.
About Lamella – the BioHPC cloud storage gateway
Lamella is our cloud storage gateway, with a convenient web interface for managing your data. Through Lamella, you can access your files via a web browser; create mount points to map your BioHPC space to your Windows PC, Mac or Linux machine; and transfer files via FTP. Lamella is the gateway system for any non-BioHPC machine within the UT Southwestern network to access files stored on BioHPC.
For information about using Lamella, creating mount points, and connecting your non-BioHPC workstation to BioHPC storage, please see our cloud storage guide.
Using the BioHPC Computer Cluster
Introduction to the compute cluster
Our compute cluster is called Nucleus, and has 574 nodes right now. Nucleus is a heterogeneous cluster, with a variety of different nodes with different specifications. Nodes are available with 32GB, 128GB, 256GB, and even 384GB of memory and several dozen computational threads, as well as many additional nodes with modern GPU cards.The cluster is running RedHat Enterprise Linux 7.6, and uses the SLURM job scheduling software. Those familiar with the TACC Stampede supercomputer at UT Austin will recognize similarities between our setup and theirs.
Generally, to run programs on Nucleus you must interact with the SLURM job scheduler and understand how to use software modules. The job scheduler allocates time on the cluster to users, queueing their jobs and running them when compute nodes are available. Jobs can be submitted to the scheduler manually via the command line, or more easily using the online submission tool. Tasks which are more easily performed through an ordinary desktop environment can be done in the context of a Web Visualization job, allowing you to access a BioHPC desktop environment from your local workstation, Windows PC, or Mac.
The modules system for software
BioHPC serves a variety of users with different and sometimes conflicting computational needs. Different software, libraries, and even different versions of each package might be necessary for performing your work. We use a system of ‘modules’ to provide a wide range of packages. On the cluster or clients and workstations, you can load modules of software that you need. If you need additional software, or updated versions of existing software then please email us. If you are trying things out, and know how to, you can also install software into your home directory for your sole use.
Here’s an example of using software modules where we want to run the 'cufflinks' RNA-Seq analysis tool. From a command line on the compute cluster or a workstation we can run module list to see software modules currently in-use in our current session. If we try to run the cufflinks command it fails, because the relevant module is not loaded. To run software the system must know the path of the program, and often the location of libraries and configuration. Each module provides this information for a particular software package.

We can search for a cufflinks module with module avail cufflinks, and then load it into our session with module load cufflinks or module load cufflinks/2.1.1 if we want version 2.1.1 specifically. Now the output of module list shows the cufflinks modules, as well as boost – a library which cufflinks depends on. We can now run the cufflinks command directly to use the software, as below:
Module Commands
To use BioHPC software modules effectively, familiarize yourself with the following commands, which load, unload, list, search for, and display help about modules. Remember that you can contact biohpc-help@utsouthwestern.edu if you are unsure about a module, which version of a module to use, or if you need additional software setup.
module list
Show loaded modules
module avail
Show available modules
module load <module name>
Load a module, setting paths and environment in the current session
module unload <module name>
Unload a module, removing it from the current session.
module help <module name>
Help notes for a module
module –H
Help for the module command
You could also check the availabe module through portal - software - module browser.

Submitting a compute job via the portal
Once you have transferred data to BioHPC storage, the easiest way to submit a compute job is to use the Web Job Submission tool, which can be accessed from the BioHPC portal Cloud Services menu. This tool allows you to setup a job using a simple web form, automatically creating and submitting the job script to the SLURM scheduler on the cluster. Work through the form, filling in the fields according to the information below:
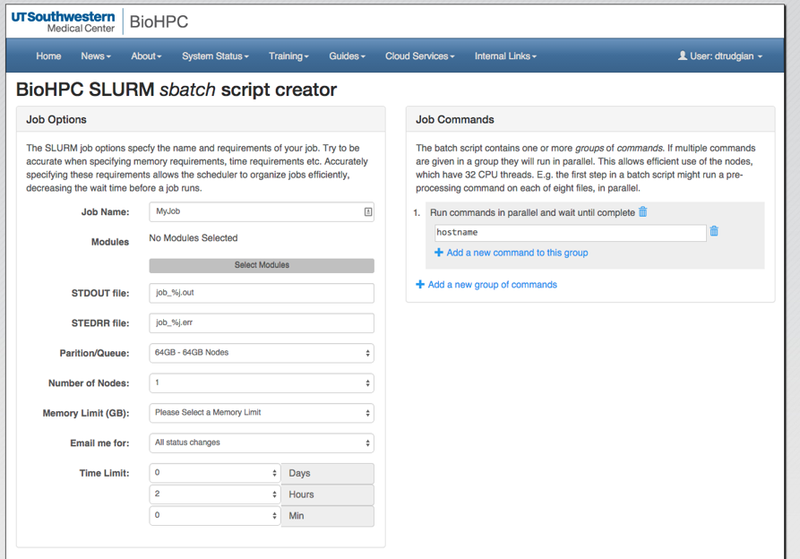
| Job Name | This is a name for your job, which will be visible in the output of the squeue command, and on the public job list shown on the BioHPC Portal. Use a short but descriptive name without spaces or special characters to identify your job. |
| Modules | When running a job, you must load any modules that provide software packages you require. If you are going to run a MATLAB script, you must load a MATLAB module. Click the Select Modules button to access the module list. You can select any combination of modules with checkboxes. Note, however that some combinations don't make sense (e.g. 2 versions of the same package) and may cause an error on submission. |
| STDOUT file | Any output your commands would normally print to the screen or console will be directed to this file when your job is run on the cluster. You will find the file within your home directory, under the portal_jobs subdirectory. You can use the code '%j' to include the numeric job ID in the filename. |
| STDERR file | Any errors your commands would normally print to the screen will be directed to this file when your job is run on the cluster. You will find the file within your home directory, under the portal_jobs subdirectory. You can use the code '%j' to include the numeric job ID in the filename. |
| Partition/Queue | The Nucleus cluster contains nodes with different amounts of RAM, and some with GPU cards. The cluster is organized into partitions separating these nodes. You can choose either a specific RAM partition, the GPU partition if you need a GPU card, or you can use the super partition. The super partition is an aggregate partition containing all 32, 128, 256 and 384GB nodes which can be used when it's not important that your job runs on any single specific type of node. |
| Number of Nodes | The number of nodes required for your job. Programs do not automatically run on more than one node - they must use a parallel framework such as MPI to spread work over multiple nodes. Please review the SLURM training before attempting to run jobs across multiple nodes. |
| Memory Limit (GB) | Specifies the amount of RAM your job needs. The options will depend on the partition selected. Choose the lowest amount required in order that your job can be allocated on the widest range of nodes, reducing wait times. |
| Email me | The SLURM scheduler can send you an email when your job starts running, finishes etc. You can turn these emails off if you wish. |
| Time Limit | Try to estimate the amount of time your job needs, add a margin of safety and enter that time here. The scheduler relies on job time limits to efficiently fit smaller jobs in between larger ones. Jobs with shorter time limits will generally be scheduled more quickly. Beware - this is a hard limit. If your job take longer than the limit entered it will be killed by the scheduler. |
| Job Command |
The actual commands to run, such as 'matlab -nodisplay < hello.m' to run a matlab script, are entered in this section. You can have one or more command groups, each containing one or more commands. All of the commands in a group will be run at the same time, in parallel. The groups themselves run sequentially. Everything in the first group must finish before the second group begins. By default there is a single command in the first group, hostname. This simply prints the name of the compute node your job runs on. You can replace it with a real command, or add another command group for your own commands. |
Below the web form you will see the SLURM sbatch script that is being created from your choices. It is updated whenever you make a change in the form. The script contains comments beginning with #, and parameters for the scheduler beginning with #SBATCH. Setting up jobs using the web form and then reviewing the script that is created is a good way to learn the basics of SLURM job scripts so that you can write your own. Note that you can even edit the script before you submit the job, but a script that as been edited cannot be further modified using the web form.
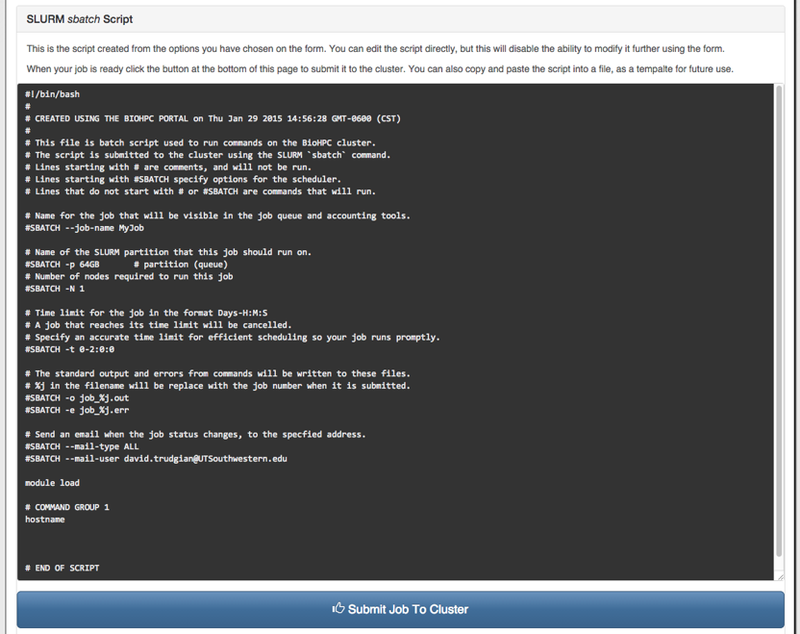
When you are happy with the settings and commands for your job, you can submit it using the button at the bottom of the page, below the script. If the format is good and the settings are valid, the Portal will report that the job has been submitted and supply a Job ID. If there is a problem you may receive an error message from sbatch, which the portal will display. You can email with any questions or problems you have submitting jobs.
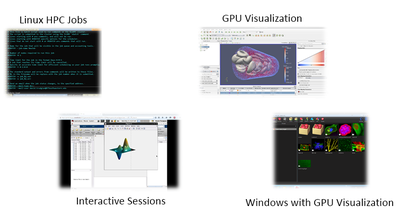
Connecting to an interactive GUI visualization session
BioHPC allows interactive use of cluster nodes, for visualization debugging and running interactive software, through the portal's Web Visualization service. Using this interface, you can run a Linux desktop session on a cluster node (WebGUI), on a GPU node with 3D OpenGL acceleration (WebGPU), or start a powerful Windows 7 virtual machine with 3D acceleration (WebWindows). To start a session and connect to it, use the Web Visualization link in the Cloud Services menu of the Portal:
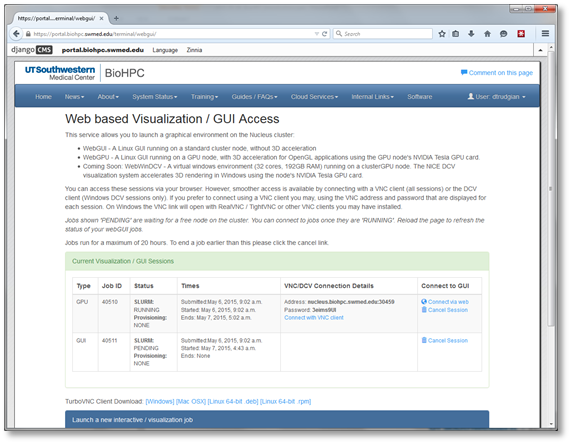
The page that is displayed lists the connection information for any currently running visualization sessions you may be running. At the bottom is a form allowing you to start a new session. Choose the type of session you need and click the submit button to queue the visualization job on the cluster. All visualization jobs are limited to 20 hours. Visualization jobs are like any other SLURM job and are dependent on node availability so it can take some time for them to start when the cluster queue is busy. Note that the 20 hour time limit only applies once your visualization job is actually running. Once a session has started you will see VNC connection details for your session, and a link to connect directly from your web browser. The screenshot below shows MATLAB running in a WebGPU session with a connection made from the web browser:
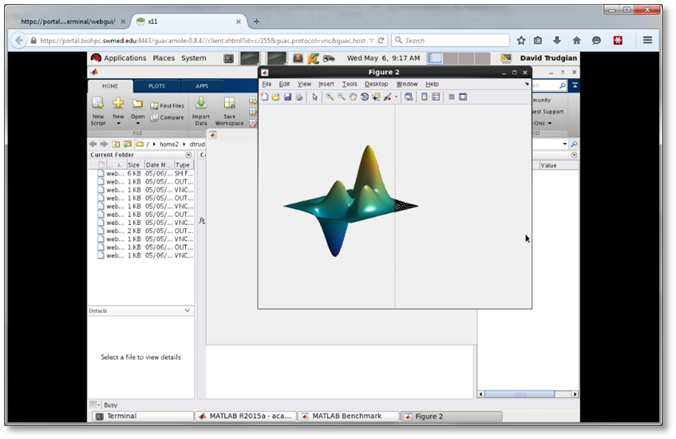
The web browser connections is convenient, but a smoother and higher resolution experience is possible by connecting using a VNC client, particularly if you are using a wired network connection on campus. Connection details are displayed for each running session. If you are not using a BioHPC client or workstation you can download the TurboVNC client on our Software page. TurboVNC is the recommended VNC client for best performance and compatibility with our sessions. To resize the Turbo VNC client, increase the resolution of the client through System->Preferences->Display menu to increase the display size of the client on the host machines. Higher resolution can cause a slower or higher-latency experience.
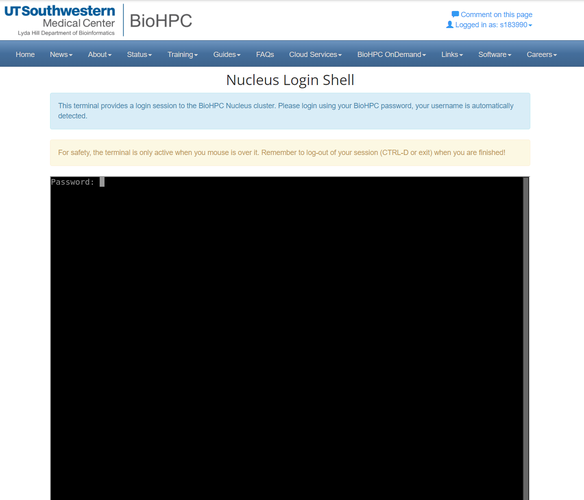
Command line access via the portal and SSH
If you are comfortable using the Linux command line, or want to learn, you can login to our systems using the Secure Shell (SSH) to the nucleus.biohpc.swmed.edu cluster head node, also known as nucleus005. The head node of the cluster allows users to login, manipulate and edit files, compile code and submit jobs. It should not be used to run analyses, as this will affect the response for others who are using the system. Software and analyses which consume excessive RAM or CPU time on shared nodes are subject to being terminated without warning.
The easiest way to login to the cluster is to use the Cloud Services - Nucleus Web Terminal of the portal website. This provides a command line interface inside your web browser. You will need to enter your BioHPC password when the connection is made. Note that if you close your browser, or browse to a different page, your connection will close.
To login using a stand-alone SSH client, please connect to nucleus.biohpc.swmed.edu using your biohpc username and password.
If you are using a Mac or Linux computer, you can use the ssh command in a terminal window - ssh username@nucleus.biohpc.swmed.edu
If you are using a Windows PC you will need to download an SSH client program. We recommend , which is available via a link on the portal Software section.
Useful Linux Commands
The following commands are useful when working with Linux on BioHPC. See also the material from our Linux command line & scripting training session.
quota –ugs
Show home directory and project directory quota and usage
panfs_quota -G /work
Show work directory quota and usage
du –sh <directory>
Show size of a specific directory and it’s contents
squeue
Show cluster job information
sinfo
Show cluster node status
sbatch myscript.sh
Submit a cluster batch job using a script file
cat filename
Display a file on the screen
less filename
Displays a file so that you can scroll up and down. ‘q’ or ctrl-c quits
vi or vim
Powerful text editors, with a cryptic set of commands! See
nano
Simpler, easier to use! See
Using the SLURM Job Scheduler
Earlier in this document, we described how to submit a job using the web job submission service on the BioHPC portal. You can also work with the cluster's SLURM job scheduler from the command line. If you are familiar with another job scheduler (e.g. PBS, SGE), SLURM is similar but with different names for the common commands.
A comprehensive training session on using the SLURM job scheduler is given every 3 months. Please check the BioHPC training calendar and the materials from past sessions for more information.
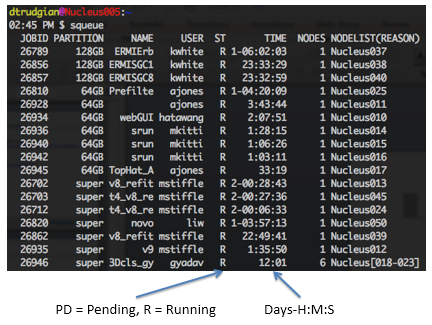
squeue - view the job queue - From any biohpc system you can run the squeue command to display a list of jobs currently being managed by the scheduler. The job status is shown as a 1-2 letter code, and times are in Days-Hours:Mins:Seconds format:
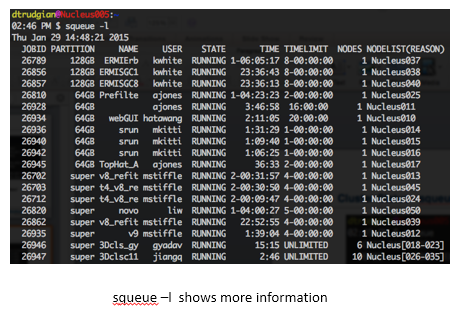
A more complete output, including the full status and the time-limit for each job can be obtained using the -l option to squeue:
The list of jobs on the cluster can be long at times. To see only your own jobs use the -u <username> option, e.g. squeue -u dtrudgian
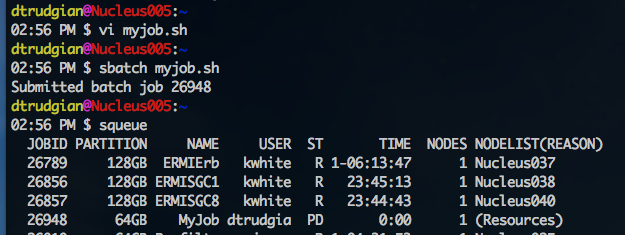
sbatch - submit a job - If you are comfortable writing SLURM job scripts for your jobs you can submit them to the cluster using the sbatch command. In the sample below the script myjob.sh was created using the vi editor, then submitted using sbatch myjob.sh. The output of the sbatch command is a numeric job ID if successful, or any error message if there are problems with your job script. Once you have submitted a job you can see it in the cluster queue with the squeue command. In the example, the job is waiting to run with the reason given as (RESOURCES) as the scheduler is waiting for a node to become available:
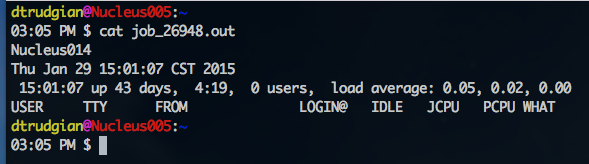
When a node became available the job was executed successfully, and output messages written into the file specified in the job script. In this case the file was named job_26948.out and we can view it's content with the cat command:
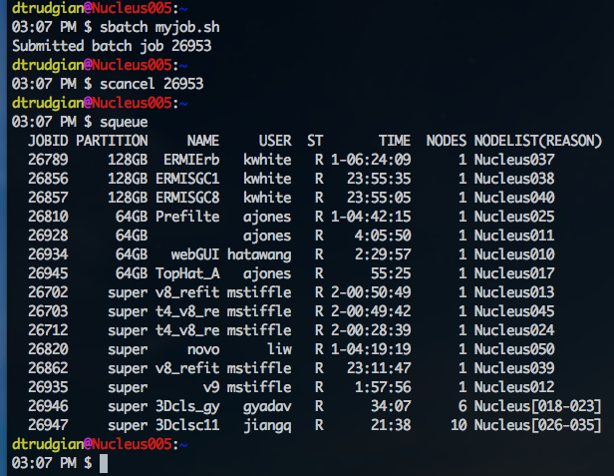
scancel - cancelling a submitted job - If you make a mistake when submitting a job, please cancel it so that it does not occupy time on the cluster. The scancel command takes a job ID as it's only argument. In the example below we use the comand scancel 26953 to stop our job running. We can check that it was cancelled correctly, by examining the output of squeue - the job is no longer in the cluster queue. If you don't remember the job ID for a job you need to cancel check the output of squeue -u <username> which will list the details of all of your current jobs.
Next Steps
Now that you have worked through this introduction to BioHPC you should experiment with our systems! Make sure you can successfully login to the Portal, use the web based job submission and connect to a web visualization session.
We offer training sessions on our cloud storage system, the SLURM scheduler, and a variety of other topics relevant to using BioHPC Please check the training calendar and make a note of any sessions that are applicable to your work.
If you have any questions, comments, or sugesstions please contact us via or use the 'Comment on this page' link above the menu bar.
Last updated 22 Jun 2021, DO