Using Git on BioHPC
BioHPC recommends that users developing code and script use the Git version control system to maintain a history of their code, and allow collaborative development with other users. We offer a web-based Git repository system at https://git.biohpc.swmed.edu
The following guide to using git was kindly originally provided by Sebastien Besson for the Danuser Lab, and has been adapted here for general use.
We also recommend the comprehensive tutorials and workflow documentation provided by Atlassian on the web. These tutorials are step-by-step and cover many common patterns of use: https://www.atlassian.com/git/tutorials/
Setting up Two-Factor Authentication
Having two-factor authentication active on your GitLab account dramatically reduces the risk that someone can access your account without your knowledge. It is strongly recommended that you configure two-factor authentication.
- Go to https://git.biohpc.swmed.edu/-/profile/account after logging into your git.biohpc.swmed.edu account (same credentials as the rest of BioHPC)
- Under Two-Factor Authentication, click the button that says Enable two-factor authentication

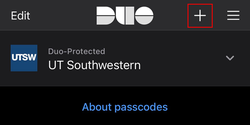
- Open your Duo Mobile app on your mobile device and select Add Account. This may take the form of a + sign in the corner of your app.
- Choose one of the following registration methods: Either a) Scan the QR code shown on your GitLab account page using your Duo app, or b) select No Barcode? , select the GitLab account option, and manually enter in the account and key shown on your GitLab account page.
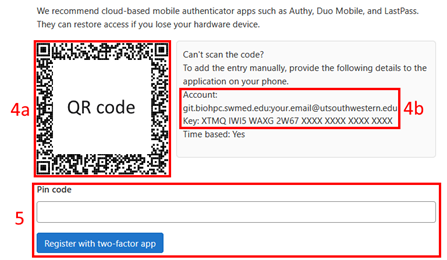
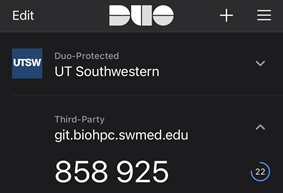
- Once your Duo app has generated a pin code such as that seen below, enter it on your GitLab page and select Register with two-factor app.
- You will receive a list of 10 alphanumeric codes to make it easier to recover your GitLab account if you can no longer access your Duo app. You should print these off and keep them in a secure place, or copy them to a password manager.
- Once you have copied, downloaded, or printed your codes, click Proceed and you're done!
Checking out code from the BioHPC git service
Before checking out a repository, first make sure Git is installed and which version is installed.
$ git --version
Checking out any repository involves the git clone command and requires the clone URL of the repository. This URL can be found in the top right corner in the Web interface of the Git repository. There is a choice of two URLs you can use for cloning.
Cloning using HTTPS
The https:// clone URLs are available on all repositories, public and private. They are smart, so they will provide you with either read-only or read/write access, depending on your permissions to the repository.
If using Git 1.7.9 or earlier you may experience issues if you specify your username on the clone command. You should specify only the repository name, and you will be prompted for your username and password on each connection. On some systems there may be problems with the prompts. If you experience issues try using the ssh connection method. Don't specify your username and password in the clone command as this will store your BioHPC password in plain text in the repository configuration file on your computer!
$ git clone https://git.biohpc.swmed.edu/xxx/xxx.git

Cloning into 'xxx'...

remote: Counting objects: 3, done.

remote: Total 3 (delta 0), reused 0 (delta 0)

Unpacking objects: 100% (3/3), done.

Checking connectivity... done.
If using Git 1.7.10 or above, you can pass your BioHPC username in the HTTPS URL:
$ git clone https://username@git.biohpc.swmed.edu/xxx/xxx.git

Cloning into 'xxx'...

Password for 'https://xxx@git.biohpc.swmed.edu':

remote: Counting objects: 3, done.

remote: Total 3 (delta 0), reused 0 (delta 0)

Unpacking objects: 100% (3/3), done.

Checking connectivity... done.
or clone without authentication:
$ git clone https://git.biohpc.swmed.edu/xxx/xxx.git

Cloning into 'sandbox'...

Username for 'https://git.biohpc.swmed.edu': username

Password for 'https://username@git.biohpc.swmed.edu':

remote: Counting objects: 3, done.

remote: Total 3 (delta 0), reused 0 (delta 0)

Unpacking objects: 100% (3/3), done.

Checking connectivity... done.
Cloning using SSH
To use the SSH interface, you will to setup and register SSH keys. If you are working on a BioHPC workstation, thin-client, or the nucleus login node then an SSH key is already configured for you in the .ssh folder of your home space, and you can register it with the git service. If you are using your own PC or laptop then you need to generate ssh keys. See the https://git.biohpc.swmed.edu/help/user/ssh.md page on how to generate SSH keys if you don't have any and register them in the Web interface.
Check everything is setup by typing ssh -T
$ ssh -T git@git.biohpc.swmed.edu

Welcome to GitLab, xxx!
Then you can clone the repository using the git@ clone URLs are available on all repositories, public and private:
$ git clone git@git.biohpc.swmed.edu:xxx/xxx.git

Cloning into 'xxx'...

remote: Counting objects: 3, done.

remote: Total 3 (delta 0), reused 0 (delta 0)

Unpacking objects: 100% (3/3), done.

Checking connectivity... done.
Git Remotes - Where changes are pushed
The clone operation will create a local Git repository with one remote called origin pointing at the BioHPC Git repository and one branch master.
$ cd sandbox

$ git remote -v

origin  https://git.biohpc.swmed.edu/danuser/xxx.git (fetch)

origin  https://git.biohpc.swmed.edu/danuser/xxx.git (push)
$ git branch
* masterCommitting changes
Once you have the repository checked out, you can start modifying files and committing your changes locally, e.g.
$ vim new_file # create a new file in an editor and edit it
$ vim existing_file # open the file in an editor and edit
The status of the files should be listed from the git status command:
$ git status
On branch master
Your branch is ahead of 'origin/master' by 1 commit.
(use "git push" to publish your local commits)
Changes not staged for commit:
(use "git add <file>..." to update what will be committed)
(use "git checkout -- <file>..." to discard changes in working directory)
modified: existing_file
Untracked files:
(use "git add <file>..." to include in what will be committed)
new_file
no changes added to commit (use "git add" and/or "git commit -a")
To stage the files for the commit, use git add. Note this command should be used whether the file already exists or not
$ git add new_file
$ git add existing_file
$ git status
On branch master
Your branch is ahead of 'origin/master' by 1 commit.
(use "git push" to publish your local commits)
Changes to be committed:
(use "git reset HEAD <file>..." to unstage)
modified: existing_file
new file: new_file
Then you can commit these changes using git commit:
$ git commit
Without arguments, this command will open the default editor asking to enter the message corresponding to your commit. Convention is to create a short one-line description of the commit optionally followed by a blank line and a more thorough description of the set of changes. Then save your changes and exit the editor to create the commit.
For example, if your default editor is vi:
type i to enter the editing mode,
insert your commit message,
once you are done editing, type Esc to leave the editing mode,
type :wq to save and exit the editor.
Alternatively, the commit message can be passed as an argument using the -m option:
$ git commit -m "Add new_file and edit existing_file"
[master 255efd5] Add new_file and edit existing_file
2 files changed, 1 insertion(+)
create mode 100644 new_file
Fetching upstream changes
To fetch the upstream changes, use the git fetch command. This will download changes, but will not automatically merge them with your local copy of the repository.
$ git fetch origin
Username for 'https://git.biohpc.swmed.edu': username
Password for 'https://username@git.biohpc.swmed.edu':
To fetch and merge the upstream changes in one step, use git pull:
$ git pull
Username for 'https://git.biohpc.swmed.edu': username
Password for 'https://username@git.biohpc.swmed.edu':
Already up-to-date.
Creating branches locally
With Git, working on features on isolated branches is quite straightforward. A branch is a separate line of code changes, where you can work independently, merging your changes into the master branch when you are happy with them. First a branch needs to be created, e.g. to create and check out a local branch called my_branch based on master:
$ git checkout -b my_branch master
Switched to a new branch 'my_branch'
The git branch command lists all local branches and marks the active one with an asterisk:
$ git branch
master
* my_branch
Then file changes can be performed and committed to the my_branch branch as described above. To switch back to the master branch, use the git checkout command:
$ git checkout master
Switched to branch 'master'
$ git branch

* master
my_branchPushing changes to the server
The commands above allow you to create commit(s) on your local repository. When you want to synchronize these changes with the upstream repository, you will need to use the git push command. The first argument of the command is the name of the remote where you push to and the second argument is the name of branch. For instance to push your local master branch to the upstream origin remote:
$ git push origin master

Username for 'https://git.biohpc.swmed.edu': username

Password for 'https://username@git.biohpc.swmed.edu':

Counting objects: 3, done.

Delta compression using up to 8 threads.

Compressing objects: 100% (2/2), done.

Writing objects: 100% (3/3), 1.09 KiB | 0 bytes/s, done.

Total 3 (delta 1), reused 0 (delta 0)

To https://git.biohpc.swmed.edu/xxx/xxx.git

   536f878..b5ec753  master -> master
Forking repositories
'Forking' creates a copy of a repository, including the branches in that repository. From the Web interface, click on the Fork button to create a fork of the xxx repository on git.biohpc.swmed.edu. This should create a new Git repository at https://git.biohpc.swmed.edu/first.last/xxx. The repository has the same URL as the parent repository except for the first.last namespace which matches your Git username.
Add your remote locally using git remote add. You will need to specify an alias for the remote. For instance, you can use the Git username of the repository: first.last or the BioHPC username: username. Here again, you can either use the HTTPS URL the fork repository:
$ git remote add username https://username@git.biohpc.swmed.edu/first.last/xxx.git

$ git remote -v

origin  https://git.biohpc.swmed.edu/xxx/xxx.git (fetch)

origin  https://git.biohpc.swmed.edu/xxx/xxx.git (push)

username    https://username@git.biohpc.swmed.edu/first.last/xxx.git (fetch)

username    https://username@git.biohpc.swmed.edu/first.last/xxx.git (push)
or the SSH URL:
$ git remote add first.last git@git.biohpc.swmed.edu:first.last/xxx.git

$ git remote -v

origin  git@git.biohpc.swmed.edu:danuser/xxx.git (fetch)

origin  git@git.biohpc.swmed.edu:danuser/xxx.git (push)

first.last  git@git.biohpc.swmed.edu:first.last/xxx.git (fetch)

first.last  git@git.biohpc.swmed.edu:first.last/xxx.git (push)
The following example combines the different sections above to: 1- create a local branch 2- commit local changes 3- push this local branch to
$ git checkout -b fork --track origin/master

# Make changes

$ git add README.md

$ git commit

$ git push username fork

Password for 'https://username@git.biohpc.swmed.edu':

Counting objects: 3, done.

Delta compression using up to 8 threads.

Compressing objects: 100% (2/2), done.

Writing objects: 100% (3/3), 597 bytes | 0 bytes/s, done.

Total 3 (delta 1), reused 0 (delta 0)

To https://git.biohpc.swmed.edu/first.last/xxx.git

* [new branch]      fork -> fork
Merge Requests
Merge requests let you tell others about changes you have pushed to a repository. Once a merge request is sent, interested parties can review the set of changes, discuss potential modifications, and even push follow-up commits if necessary.
Merge requests can be opened between branches of the same repositories or from a branch belonging to a different forks.
To open a merge request, go to the Merge Requests tab of the main repository and click on New Merge Request. Select the head branch (From) and the base branch (To), add a title and a description and click Submit merge request. Your changes should now be visible and can be reviewed and discussed before they get accepted into the mainline.
Git workflows
Git is an extremely flexible tool, which can support a wide-range of collaborative workflows for code development. If you are working within a team it's worth defining a workflow that you will use to make changes to code, and share these changes amongst your group. The Atlassian git tutorials give an excellent overview of the types of workflows that you might consider: https://www.atlassian.com/git/tutorials/